CAD Pro Extended Download Terms of Agreement
CAD Pro Extended Download Terms of Agreement
Save Time and Safeguard Your CAD Pro Software Purchase with EDS (Extended Download Service)
Securely back up your CAD Pro software online for one (1) year from the date of purchase.
Now purchasing CAD Pro software online is more convenient than ever. Our Extended Download Service frees you from the time-consuming — but critical — chore of backing up your new CAD Pro software.
Simply purchase EDS as part of your order. We’ll automatically store on our server a back-up copy of the CAD Pro software that you purchased and downloaded for one (1) year from the date of purchase.
System crash? Hard disk error? No Worries! You can re-download your CAD Pro software anytime during your extended protection period.
Your use of Extended Download Service is governed by the CAD Pro Terms and Conditions.
CLICK HERE to review the Terms and Conditions.
Why I’m not getting a response from Cad Pro Support Team?
If you cannot view or receive Cad Pro support emails, please check the following;
- Junk Email Folder – Depending on the protection level that you set for the Junk Email Filter, some legitimate email messages might be moved to the Junk E-mail Folder. You should periodically review the messages in the Junk E-mail folder so that you aren’t missing any messages that you want to see. Be sure to change your settings, so you may receive any and all Cad Pro support emails.
- Firewall – These are designed to prevent emails from non-approved sites and can sometimes target legitimate files and legitimate websites if the settings are set to high.
- Antivirus Programs – These can cause problems by scanning emails that are sent to your email address, causing the email to be blocked or filtered.
- Spam Filters – Spam filters may also block email responses if set to high, resulting in your emails being blocked or sent to your junk mail folder.
Cad Pro Tech Support Contact Information:
Within emails that are automatically sent to you at time of purchase, you will find information concerning your software purchase. These emails provide the necessary information for contacting our technical support team.
It’s required that you complete our Software Support Form found under the Support menu of the Cad Pro website.
INSTALLATION OF CADPRO
How to install your CadPro Installer.exe file after downloading.
It’s required that you install the software after you have completed the download process.
How to install your CadPro Installer.exe file after downloading.
- Open the download folder for your internet browser.
- Locate the CadPro9Installer.exe file, now right click on the Cad Pro icon and select copy.
- Now paste the Cad Pro file on your computer’s desktop.
- After pasting the file to your desktop, double-click on the file icon of the CAD Pro Installer file. After you double-click on the installer file, please follow the step by step instructions to complete the installation process.
IMPORTANT
The serial number for installation was automatically emailed to you at the time of purchase.
How to install CAD Pro with the CAD Pro USB Drive?
- Insert the CAD Pro USB Drive into the USB port on your computer.
- Open the USB directory, so you may view the files on the CAD Pro USB Drive.
- Right click on the CAD Pro Installer icon and select copy.
- Now go to the desktop of your computer and paste the CAD Pro installer file on your desktop.
- Now double click the CAD Pro Installer file icon on your desktop and follow directions to complete your installation. You will need the email which was automatically sent to your email address at the time of purchase. Within this email is your serial number for the CAD Pro software.
- For the recommended installation, press the NEXT> button on every dialog box which will appear on your screen.
- There will be (3) required questions for a successful installation:
- Serial Number: Please enter the serial number which is located within the email sent to you at the time of purchase. (Make sure there are NO blank spaces or extra characters when entering your serial number).
- Full Name: This would be the name of the main registered user. This information may need to be verified during technical support requests, etc.
- Organization: This is an optional field. Home users may wish to leave this blank. Corporate users should enter their company name.
- By Windows convention the installation folder is located in the “Program Files” folder. For more advanced users, there are options to choose a different installation folder for CAD Pro.
- After installation, you will notice that CAD Pro has conveniently added a launch icon to your desktop. CAD Pro is also available by pressing Start/Programs/CAD Pro.
- After launching CAD Pro, if you use File/Open you will find that CAD Pro defaults to the My Documents folder for the current user account. Within that folder you will find the My CAD Pro Files folder. This is created for your convenience. Use this folder to store and organize all your CAD Pro drawings and custom symbols. HINT: Making sub-folders under My CAD Pro Files is a good way to organize your drawings!
How to install CAD Pro with a CD?
- Insert the CD into the CD drive on your computer.
- Open the CD directory, so you may view the files on the Cad Pro CD.
- Right click on the CAD Pro Installer icon and select copy.
- Now go to the desktop of your computer and paste the CAD Pro installer on your desktop.
- Now double click the CAD Pro Installer icon on your desktop and follow directions to complete your installation. You will need the email which was automatically sent to your email address at the time of purchase. Within this email is your serial number for the CAD Pro software.
- For the recommended installation, press the NEXT> button on every dialog box which will appear on your screen.
- There will be (3) required questions for a successful installation:
- Serial Number: Please enter the serial number which is located within the email sent to you at the time of purchase. (Make sure there are NO blank spaces or extra characters when entering your serial number).
- Full Name: This would be the name of the main registered user. This information may need to be verified during technical support calls, etc.
- Organization: This is an optional field. Home users may wish to leave this blank. Corporate users should enter their company name.
- By Windows convention the installation folder is located in the Program Files folder. For more advanced users, there are options to choose a different installation folder for CAD Pro.
- After installation, you will notice that CAD Pro has conveniently added a launch icon to your desktop. CAD Pro is also available by pressing Start/Programs/CAD Pro.
- After launching CAD Pro, if you use File/Open you will find that CAD Pro defaults to the My Documents folder for the current user account. Within that folder you will find the My CAD Pro Files folder. This is created for your convenience. Use this folder to store and organize all your CAD Pro drawings and custom symbols. HINT: Making sub-folders under My CAD Pro Files is a good way to organize your drawings!
Administrative Privileges Warning
Microsoft’s operating systems will sometimes turn on administrative privileges when the operating system is installed on your computer. This happens a lot when performing an upgrade from an older version of the Windows operating system.
How to Install Cad Pro as the Administrator
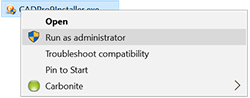
Method 1
Alternatively, when you install your software, right click the setup button (CadPro Installer File Icon) and select “Run as Administrator“.
Method 2
Navigate to the Control Panel; make sure “small icons” is selected in the upper right drop down.
Open User Accounts. Click the link that says “Change User Account settings”.
Move the slider from the top position to the second position where it will say “Don’t notify me when I make changes to Windows settings”.
If you have any other issues with administrative privileges or any other setting within the Windows operating system you will need to contact Microsoft.
Microsoft Windows Support Link;
https://support.microsoft.com/en-us/contactus/
Can I install CAD Pro on a single user account only?
The CAD Pro install is specifically designed to support Windows fast user switching, and we therefore choose not to support single user installation on a network. By default, once CAD Pro is installed, it is available to all user accounts on that system. The CAD Pro install requires that someone with administrative privileges install the software.
HOW TO USE DIFFERENT INTERNET BROWSERS
Downloading CAD Pro using Firefox Internet Browser
The following link article describes what information is displayed, how to access your downloads, manage your files and set downloading options when using Firefox.
https://support.mozilla.org/en-US/kb/find-and-manage-downloaded-files
How to change what Firefox does when you click on or download a file
The following link will describe how Firefox handles downloads for different types of files and how you can change that behavior.
https://support.mozilla.org/en-US/kb/change-firefox-behavior-when-open-file
How to download CAD Pro using Google Chrome download instructions
The following link explains how you download something from the Web in Google Chrome.
https://support.google.com/chrome/answer/95759?hl=en
How to manage your download history/files with Google Chrome
The following link article applies to Google Chrome on Windows, Mac, Linux, and Chrome OS..
https://support.google.com/chrome/answer/95758
Downloading CAD Pro and Installation with Internet Explorer or Edge
- Click on the download link found within your CAD Pro confirmation email.
- If using Internet Explorer your Download Manager dialog box will appear.
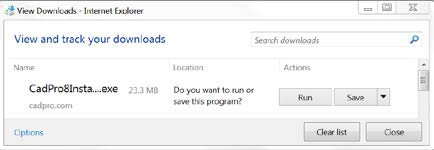
- Click on the CAD Pro file name as shown above.
- Now click on Save or the arrow next to Save, this will allow you to Save the CAD Pro file to the directory of your choice.
- Once you have saved the CAD Pro Installer file to your computer.
- Now locate the file and double click on the CAD Pro Installer file icon.
- CAD Pro installer will automatically launch and begin the installation process.
- For the simplest installation, press the NEXT> button on every page that comes up.
- All you have to do during the installation process is answer three questions:
- Serial Number: For Digital Downloaded Software, use the serial number included in your confirmation email.
(Be sure there are NO blank spaces in the serial number) - Full Name: This would be the name of the registered user. This information will be necessary during technical support requests.
- Organization: Home users may leave this blank. Corporate users should put their company name in this field.
- Serial Number: For Digital Downloaded Software, use the serial number included in your confirmation email.
- The Windows installation folder is located in the Program Files folder. For more advanced users, there are options to choose a different installation folder for CAD Pro.
- After installation, you will notice that CAD Pro has conveniently added a launch icon to your desktop. You can launch the program by double clicking on the program icon.
- CAD Pro is also accessible by selecting CAD Pro from the Start Menu.
- After launching CAD Pro, if you use File/Open you will find that CAD Pro defaults to the My Documents folder for the current user account. Within that folder you will find the My CAD Pro Files folder. This is created for your convenience. Use this folder to store and organize all your CAD Pro drawings and custom symbols. HINT: Making sub-folders under My CAD Pro Files is a good way to organize your drawings!
How to download CAD Pro with Internet Explorer
The link below explains how to download files using Internet Explorer.
http://windows.microsoft.com/en-us/internet-explorer/download-files#ie=ie-11
How to find a download file when using Windows Internet Explorer 7 & 8
The following link article contains information on downloading files with Internet Explorer 7 & 8.
http://windows.microsoft.com/en-us/windows-vista/find-a-file-you-have-downloaded
Using download manager in Internet Explorer 9
The following link contains information for using Download Manager within Internet Explorer 9.
http://windows.microsoft.com/en-us/windows/using-download-manager-internet-explorer#1TC=windows-7
Windows / Internet Explorer SmartScreen filter information and instructions
The following link explains how to use IE SmartScreen Filter and how it can protect your computer
http://windows.microsoft.com/en-us/internet-explorer/use-smartscreen-filter#ie=ie-11
Frequently asked questions for downloading files from the internet
Here are answers to some common questions about downloading files from the Internet.
http://windows.microsoft.com/en-us/windows/downloading-files-internet-faq#1TC=windows-7
How to open download manager within Internet Explorer
The following link provides important information on how to use Internet Explorer Download Manager.
http://windows.microsoft.com/en-us/windows/using-download-manager-internet-explorer#1TC=windows-7§ion_1
DOWNLOAD PROBLEMS
You are receiving Download Max Limit Reached for CAD Pro
If you are receiving the message you have reached your download limits, then this indicates that the software has downloaded successfully to your computer. Depending on how you have setup your firewall / security software. The CAD Pro download file may be in a quarantine folder of the security software on your computer. You may be able to retrieve the CAD Pro file through the security software dashboard. Please refer to the help section of the security products you have installed on your computer.
At the time of purchase you were automatically sent an email with complete instructions for downloading the software. Be sure to check any email or spam blockers you may have installed.
After downloading the CAD Pro Installer file, it will be located in your internet browser download folder unless you save the CAD Pro file in a different directory. Depending on which internet browser you use, you will need to locate your download folder on your computer. The internet browser you use will have help instructions for locating the download folder.
You can perform a file search on your computer for the file name in your order confirmation email. Please be sure that you type exactly the name provided when performing the file search.
Once you have found the CAD Pro EXE file, you will need to install the software.
Installation: Double click on the CAD Pro EXE file icon and follow the directions to complete the installation. The serial number you will need for installation is included in the purchase confirmation email which was automatically sent to the email address entered at the time of purchase.
I’m having Download Problems or Not Receiving My Download?
At time of purchase you were automatically sent an email to the email address you entered with your order. Within your email please click on the software link and the CAD Pro software will download to the file / folder directory you have selected.
Additional reasons for not receiving your email instructions or experiencing download difficulties:
The most common reason for not receiving your email instructions is that you entered an incorrect email address at the time of purchase.
IMPORTANT – Check your order confirmation email and be sure that you entered the correct email address, please check for incorrect spelling, additional spaces not needed or any other incorrect email address information. You may send your corrections to sales@cadpro.com .
Please understand we are not responsible for incorrect information that is entered at the time of purchase.
Firewall Hardware or Software – These are designed to prevent emails or download files from non-approved sites and can sometimes target legitimate download files or emails from legitimate websites if the settings are set to high or strong. The CAD Pro website carries the Norton Secured Seal which provides excellent online assurance and therefore is a completely legitimate website.
Antivirus Programs – These programs can cause problems by scanning emails that are sent to your email address, and therefore causing the email or files to be blocked.
Spam Filters – Spam filters may also block email responses or download files if set to high, resulting in your emails or files being blocked.
Download Accelerators or Managers – These can sometimes interfere with the download process by simultaneously accessing portions of the download file multiple times, causing it to become corrupt or damaged.
Please check the settings of any of these products to ensure they are not interfering with your download prior to downloading the software. If you need assistance with these settings, please contact your IT professional.
Finally, try using an alternate browser, and/or updating your browser to the newest version. Not all browsers are fully compatible with all servers.
OPERATING SYSTEM & SYSTEM REQUIREMENTS
What Operating Systems does CAD Pro support?
CAD Pro supports the following Microsoft Operating Systems:
- Windows 11 / 10 / 8.1 / 8
- Microsoft Internet Explorer 5.01 or greater.
- Microsoft Windows Installer 2.0 or greater.
What are the System Settings that I need to know?
- CAD Pro is best used at the highest resolutions available in the PC industry.
- For the best viewing results set your display to 1024 x 768 or higher and use the True Color (32 bit) setting.
- For good viewing results set your display to 800 x 600, High Color (24 bit) setting.
- CAD Pro will run on lower settings (such as 256 color mode and 640 x 480) but with degraded viewing results.
To adjust your display settings:
- Use the Start Menu, Select Settings>Control Panel>Display>Settings.
- In the Colors drop-down list box, make sure your settings are at least High Color (24-bit) or True Color (32-bit).
- In the Screen Area section, move the slider to display at least 800 x 600 pixels.(1024 x 768 for best results).
- Click OK. The new window settings are applied. You may be prompted to restart your computer to apply the new settings. If so, click OK or Yes.
What are the System Requirements for CAD Pro?
- Windows PC Computer
- Windows 11 / 10 / 8.1 / 8
- Pentium II – class processor w/MMX
- 64MB RAM
- 60MB free hard drive space
- 16-bit color minimum, true color (24-bit) recommended
- 800X600 or higher screen resolution, 1024X768 recommended
- USB drive for installation of backup USB drive
How to run Cad Pro on a Mac Computer?
Cad Pro is designed for computers running Windows operating system.
If you wish to run CAD Pro on a Mac computer, then it’s required that you have previously installed a Windows emulation software product on your Mac computer.
Once you have properly installed Windows emulation software on your Mac, you may then install CAD Pro.
There are several Windows emulation software products available which our customers use successfully. You can research these emulation products on the internet and find the best one to fit your needs.
One of the most popular Windows emulation products on the market is Parallels. We have a lot of customers that use Parallels while running CAD Pro on a Mac computer. These types of products do require a certain level of computer expertise to operate successfully.
Here is the link to the Parallels website; http://www.parallels.com/products/desktop/
USING CAD PRO
How can I get help?
CAD Pro has a complete and intuitive User’s manual available under the Help menu of the software. The manual can be printed for your convenience. CAD Pro also has a Help Index that is available using Microsoft’s Internet Explorer 5.01. This Index is navigated the same way you navigate any internet page. There is also a CAD Pro Quick Reference sheet that is available under the Help menu. This Quick Reference sheets will help you become familiar with the menus and options available in CAD Pro.
How to open Cad Pro files?
Follows these instructions for opening pre-existing Cad Pro files. This is also the process for opening Cad Pro files from older versions of Cad Pro.
- First open the CAD Pro program and select “New Document”.
- Now pull down the File menu and select “Close”. This will close the new file you have created but will not close the program.
- Now pull down the File menu within Cad Pro again.
- Now select the “Open…”, the file open dialog box dialog box will appear.
- Once the “File Open” dialog box appears, navigate through your directories and find the Cad Pro file you wish to open.
- Once you have located the correct file name, then click on the file and select open.
This is the best method for opening pre-existing Cad Pro files.
Sketch & Trace or Photo Plug-in Feature
Cad Pro offers the ability to open any digital photo or scanned image within a Cad Pro document and then place objects or tace over the digital image using the drawing/design tools within Cad Pro.
- Scan the drawing or document you wish to trace or add objects to. You can also choose a digital photo from your smartphone or other digital device.
- Now save the photo or scanned image as one of the following formats BMP, GIF, JPEG, TIFF or PNG.
- Now open the saved photo or scanned file by choosing the Open command found under the File menu.
- Select the file type from the “Files of type” pull down menu.
- Click the “Open” button and select the file you previously saved.
- Once you have opened the photo or scanned file, you may now trace over the file using the drawing/design tools within Cad Pro.
- “Option” – When tracing over the digital photo you can setup a scale factor of your choice.
IMPORTANT
You can find this information and all the additional features within Cad Pro under the “Help Menu”.
Can you obtain site licenses for CAD Pro?
- Yes, please email DSI at sales@cadpro.com with any site license questions or requests.
Can you import and export DXF format?
CAD Pro is currently supporting the DXF format (for import only). You can purchase third party software products online that will assist you in the importing and exporting of additional file formats including DXF and DWG.
Can you import and export WMF and EMF?
CAD Pro supports imports and exports of the Windows Metafile Format (WMF) and the Windows Enhanced Metafile Format (EMF). The EMF format is superior to the WMF format, and offers a more true conversion. The WMF format has been around longer and has a larger user base. Both formats are supported by all graphically oriented Microsoft products (such as Word and Publisher), and are also supported by most third party CAD and graphics programs.
CAD Pro also imports images and photos in the following file formats:
- .BMP – Bitmap
- .GIF – Graphic Interchange Format
- .JPG – Joint Photographic Experts Group
- .TIF – Tagged Image File
- .PNG – Portable Network Graphic
WARNING: As with most format conversions, importing or exporting from these formats may involve some data loss. For best data fidelity, always use the CAD Pro native format to save and retrieve your files in CAD Pro.
Can I embed a CAD Pro drawing in a Microsoft Word file?
To use a CAD Pro drawing with Microsoft Word:
- Save your file first using the .CPF (CAD Pro) format
- Then use the File/SaveAs function and choose the .EMF file filter (to save in the Enhance Windows Metafile Format). If your filename was MyDrawing.CPF the EMF exported version will be saved as MyDrawing.EMF (unless you type in a different name when you save).
- In Word, use the Insert/Picture/From File and choose the Windows Enhanced Metafile (.EMF) filter in the dialog box.
- Now select the .EMF file (such as MyDrawing.EMF) by browsing for it.
- Press OK. Your CAD Pro drawing is now inside a Word file!
Does CAD Pro support True Type fonts?
- Yes, CAD Pro will automatically list any installed fonts on your system.To change fonts:
- First insert text by choosing the Text tool “A” from the Design toolbar.
- Single click at the position in the drawing on which you want your text, or click and drag a rectangle for the width and height of the desired text box.
- If you want to change the font of an existing text box, just select the text box and press the “F” tool on the text toolbar. After selecting the Font, Size, and attributes, press OK in the Font dialog box. The text box will automatically show your new selections.
- Also, you can choose the desired Font by pressing the “F” tool on the text toolbar, before creating a text box.
How do I find the sample drawings?
Typically CAD Pro is installed in the C:\Program Files\CAD Pro 3.0 folder. If during installation you changed the default install folder, then use that folder path instead. The sample files that come with CAD Pro can be found in the installation path. For a typical install this would be C:\Program Files\CAD Pro 3.0\Sample Files.
What if I can’t find my CAD Pro installation folder?
- Simply go to your explorer by clicking on Start/Search/Files or Folders
- In the “Search for files or folders named” field type in *.cpf
- Press “Search Now”
- The search results will show all the CAD Pro files in your system.
- Double Click on any one of the “.cpf” files to launch CAD Pro and load that file.
HINT: Any time, while browsing in your file explorer, double click on a CAD Pro (.cpf) file to launch CAD Pro and load that file.
I ordered the Bundle. Where are the Do-It-Yourself plans?
Finding Plans:
- Double click on My Computer and then on your local C drive.
- Then double click on Program Files.
- Next double click on the Cad Pro folder to see the Do It Yourself Plans folder.
How do I find the pre-drawn Symbols and Clip Art Libraries?
From CAD Pro:
- Use the File/Open Symbol.
- At the top of the Open Symbol dialog box you will see the Library and My Folders buttons. (Library is the CAD Pro default).
- The Directory area shows you two folder options – Clip Art and Symbols. Double Click on a folder to show the lists contained in that folder.Symbols
- Double click on the Symbols folder then double click on the Computers folder.
- In the Symbol Name area you will see all the names of the available symbols.
- Click on any of the symbol names to preview the symbol in the preview pane.
- Click the Place button to place the symbol in your drawing.
Clip Art
- Double click on the Clip Art folder then double click on the Computers folder.
- In the Symbol Name area you will see all the names of the available Clip Art symbols.
- Click on any of the names to preview the Clip Art in the preview pane.
- Click the Place button to place the Clip Art in your drawing.
- Pressing the My Folders button will switch you to your My Documents folder area. From there you can load or save your own custom symbols or clip art.
- You can also see manuals for both the Symbols and the Clip Art that CAD Pro has available.
From the Help Menu:
- Choose either the Symbols Library Manual or the Clip Art Manual. Both manuals are in .PDF format.
Can I build my own custom symbols?
Yes, you can! To make a custom symbol and save it, follow these directions:
- First, draw your symbol.
- Now select the whole symbol by using the select tool and draw a selection rectangle around the entire symbol. Make absolutely sure that you have included all the objects in this selection. (All of the control points of the objects you have selected will be visible when you have selected the entire symbol correctly).
- Now use the Options/Group function to group your selected objects into one group.
- Once grouped, the symbol will only show four control points (the bounding rectangle points). This is how you know you have grouped your entire symbol correctly.
- Once grouped, go to the File/Save Symbol. Type in a name for your symbol in the file name field, then press OK. You have created your own custom symbol!
Now to use that symbol:
- Choose File/Open Symbol.
- Press the My Folders button.
- Find your symbol in the sub folder that you saved your symbol into.
- Click on your symbols name. The preview pane will show your symbol once you select it.
- Press the Place button to place your symbol onto your drawing.
HINT: You can create your own clip art in the same manner. Once your object is grouped (provided it is closed) you can add fills and colors. Then continue to save in the same manner as saving the symbol.
How do I create a watermark?
- From CAD Pro start a New document then choose Layers/Layer Info.
- In the Layering dialog box rename the Layer 1 to __WATERMARK__ (this must be entered in this exact manner).
- Choose the Rename button then OK.
- Now draw, write, or import the information you want to watermark.
- Select all of this information by choosing Edit/Select All.
- Then lock the information by choosing Options/Lock.
IMPORTANT!!
Once “Locked”, watermarked information is not changeable. Objects that have been locked in a watermark layer cannot be detected, selected, unlocked, or otherwise edited.
How can I get technical support?
Users may receive free technical support questions answered via email by completing the “Software Support Form” at the following link; /support/software-support-form/ .
It’s very important to register your software before requesting technical support. You can register your software at the following link; /support/register-now/
Can the software print to a plotter?
CAD Pro supports any size printer as long as the printer is Windows compatible. When printing large drawings on a small color or laser printer, CAD Pro has excellent support for page tiling as well as overlapping pages so that you may easily place them together. In CA DPro you are also able to have a drawing print on one page. Go to File – Print and in the Print dialog box choose the Fit drawing to one page option.
Is CAD Pro offered in native languages other than English?
Currently CAD Pro only supports the English language.
CAD Pro™ is a registered trademark of Delta Software International, LLC, all rights reserved.