Tree houses are for everyone with imagination. Tree house building tips and plans will elevate your building skills with these tree house building tips from experienced builders, including attachment techniques, site choice, assembly techniques, design ideas and more.
Climbing trees has always been part of human history, allowing us to escape floods, saber-toothed tigers and intruders (especially parents with chores in mind). Building tree houses has long been part of human history. In that spirit, we’ve gathered tree house building tips and free tree house project ideas.
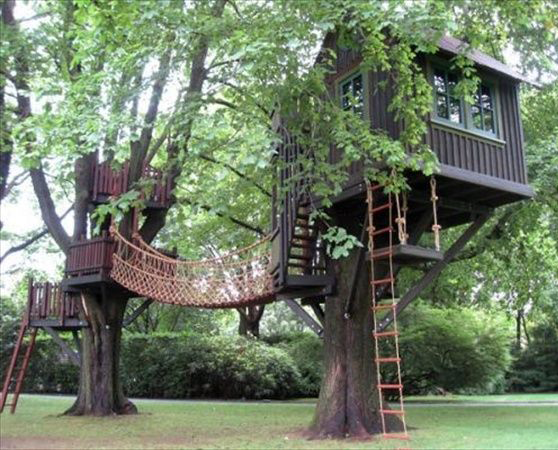
You get a different perspective when you’re up in a tree. First of all, nobody can find you because nobody ever looks up. And when you’re up there, you’re able to look up, down and all around—it’s another world up there.
Tree House Building Tips and Plans
Tree house design software with sketch tracing features.
Sketch your tree house ideas on a piece of paper, and then scan it. Now open your scanned sketch in CAD Pro and it becomes a traceable template that you can easily modify for your specific needs.
Building Tip 1: Site considerations
Choose a healthy, long-lived hardwood for maximum support, with load-bearing branches at least 8 in. in diameter (larger if the species is a softwood).
The best trees include maple, oak, fir, beech and hemlock.
You don’t have to build it very high, just high enough so nobody gets a bump on the head when walking underneath it.
Building Tip 2: Keep weight and stability in mind
Build the platform as close to the trunk as possible and add diagonal bracing for extra strength to support uneven loads.
Put the load over the base of the tree, not on one side.
For heavy tree houses, consider spreading the weight among several trees.
A tree house will act as a sail in strong winds, which can add a large load to the tree’s roots. In high-wind areas, build your tree house in the lower third of the tree.
One I built a tree house for my kids in our backyard. It was tricky getting the roof in place and, of course, nothing is square. They drew the wall design on regular paper, and we transferred the pictures to the walls, using Cad Pro drafting software.
Building Tip 3: Don’t Restrict Tree Growth
Don’t constrict branches with rope, straps or wire. This can strangle the tree.
Add spacers between the beams and the tree to allow movement.
Use extra-long large bolts. This leaves most of the shaft exposed so you can mount items on the ends and lets the tree grow over the shaft.
Allow a 2-in. gap around the tree if it passes through the floor and a 3-in. gap if it passes through the roof.
Building Tip 4: Level the floor
It’s much easier to build the rest of the structure if the floor is level and can support the entire weight of the tree house. Consider these tree house building tips and plans method:
Lay beams across the branches and shim until level.
Run the beams between trunks of different trees.
Cantilever the beams out from a single trunk and support them from above or below.
Building Tip 5: Build sections on the ground and hoist them into position
Quotes from a tree house builder:
“I built it in my driveway and used a friend’s backhoe to lift it up on the joists I’d hung in the trees. The morning of ‘the big lift’ was quite exciting. We served breakfast and coffee in the driveway for people who came to watch.”
And from another: “I assembled the platform and house on the ground, then disassembled them. After attaching the supports to the trees, I lifted the platform piece by piece and assembled it on the supports. An extra set of hands was needed only to raise the four walls and two roof sections. Final assembly took place in the trees.”
Building Tip 6: Use the right fasteners
Don’t run bolts through the tree. Lag bolts cause less tree damage than through bolts.
Don’t use too many fasteners. One large bolt is better than many screws or nails. You get the same strength but with fewer puncture wounds to the tree.
Whenever possible, perch your tree house on top of fasteners rather than pinning beams to the tree. This gives the tree room to move and grow.
Even for smaller, lighter tree houses where the load is spread over three or four attachment points, consider using 1-in.- or 1-1/4-in.-diameter lag bolts.
You can order floating brackets and tree house fasteners from specialty suppliers such as garnierlimb.com or treehousesupplies.com or special-order them from home centers. These bolts are pricey (about $100 each) and often require special tools. But they allow the tree more room to grow (they can support heavy loads up to 5 in. from the tree) and they hold more weight than normal bolts.
Fun Tree House Building Tips and Plans Check List
Building Tip 7: Checklist of cool accessories (to buy or make)
- Zip lines
- Rope swings, ladders and bridges
- Speaking tube
- Periscope
- Clothesline pulley with bucket between tree house and kitchen for frequent snacks
- Pirates’ treasure chest
- Flag
- Binoculars
- Tennis ball/potato launcher
- Water cannon
- Fire pole or slide
- Trap door
- Solar-powered lights or lanterns
- Fold-down benches and tables
Tree House Building Tips and Plans Safety Tips
Building Tip 8: Beware of tree house dangers
Building a tree house is a wonderful and romantic idea. But it’s important to go into it with your eyes open. Keep the following issues in mind:
Tree damage
Tree houses do damage trees. Foot traffic compresses the soil, which is bad for the roots. Adding weight in the branches can also stress the tree roots, and fasteners can cause infection. Most trees will survive this abuse, but think twice before you build in a treasured tree.
To minimize tree damage:
- Consider using one or two supports to take stress off the tree.
- Make the fewest punctures necessary to support the tree house safely. Any damage to the bark of the tree is a potential entry point for disease and bacteria.
- Don’t put fasteners too close together, which can weaken that section of the tree. Use at least 3/4-in. bolts spaced at least 18 in. apart vertically and 12 in. apart horizontally.
- Avoid slinging cables and ropes over branches. They cut through the bark as the structure moves.
Tree House Building Tips and Regulations
Do you need a building permit? It depends on local laws and the nature of your tree house. If you’re considering building one that will be visible to your neighbors, discuss it with them in advance to avoid problems. Often, a municipality becomes involved after a neighbor complains. Stay away from boundary lines and don’t build your tree house where it will infringe on a neighbor’s privacy.
Injuries
Kids can get hurt playing in a tree house. Don’t build higher than 8 ft. and make sure to build safe, strong rails. Also, nobody should be in a tree house in high winds or lightning.
Easy affordable tree house plans from Cad Pro are great for saving money and time when designing and building your next tree house.
CAD Pro includes pre-designed tree house plans free of charge. It’s as easy as one-two-three when working with CAD Pro’s free do it yourself tree house plans!
Share your tree house plans and designs with clients, contractors or friends and family using Dropbox®, Google Drive™, OneDrive®, and SharePoint®. Export files to Microsoft Word®, Excel®, and PowerPoint®.
FREE Tree House Building Tips and Plans
Simply open any of the do it yourself tree house plans, then customize them to fit your specific needs. Quickly print your plans or email them to your favorite contractor. This is one of the easiest ways to start building your tree house.
Tree house design software with sketch tracing features.
Sketch your tree house ideas on a piece of paper, and then scan it. Now open your scanned sketch in CAD Pro and it becomes a traceable template that you can easily modify for your specific needs.
CAD Pro has helped thousands of homeowners, professional designers, builders and contractors plan and design all types of tree house designs. CAD Pro is used by NARI professional remodelers and contractors. CAD Pro is also used by NHBA home builders and contractors.