Category Archives: Drafting Software

Best Home Lighting Ideas

To do any type of home lighting right, you will want to start with the basics and then layer on accessory lighting, so the room really pops. Most home designers will use these best home lighting ideas listed below.

In addition to layering your lighting, keep scale and size in mind as you select fixtures. Installing a light fixture that is too large can drown out your space, and undersized lighting can throw off the room’s balance and proportions. Don’t be afraid to mix it up. When you achieve the ideal balance with these best home lighting ideas, the finished effect will feel right at home.

Share Your Best Home Lighting Ideas

CAD Pro lets you quickly share your home lighting ideas and floor plans with clients, contractors or team members using Dropbox®, Google Drive™, OneDrive®, and SharePoint®. Export files to Microsoft Word®, Excel®, and PowerPoint® with a single click. CAD Pro is used by homeowners, contractors and designers for all types of floor plan design ideas.

Best Home Lighting Ideas

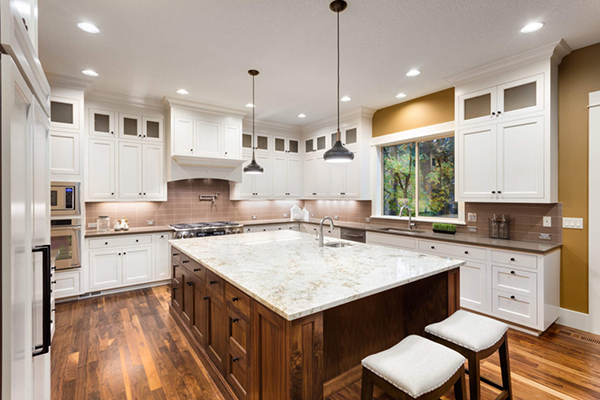
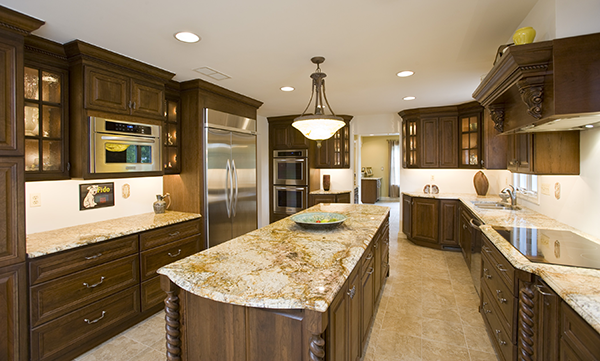
Best Home Lighting Ideas in Kitchens

Best Home Lighting Ideas for Kitchens

A must have for can lights is being sure you install a dimmer to control the amount of light.

Can lighting: A must have for can lights is being sure you install a dimmer to control the amount of light. When you design a new kitchen and customers see the grid of can lights on the ceiling, they worry about a blinding blaze of light — but that’s not the result with dimmers installed.

When you install kitchen lighting on dimmers homeowners can soften the feel of the room or increase light, as needed.

Mood lighting: Pendant lights over a bar, a chandelier over the dining table, a light fixture over the kitchen island — these are all ways to add texture, color and design style to your kitchen, while providing another layer of lighting that can be used independently or in tandem with can lighting.

Task lighting: A general rule of thumb is to add light over the sink, the stove and to illuminate prep areas within the kitchen. For some room designs, these might be pendant lights, and for others, it could be additional can lights or track fixtures.

Under-cabinet lighting: When practicing these best home lighting ideas, a great way to add dimension to your kitchen, but with added functionality. Under-cabinet lighting is an excellent source for added task lighting on the counters; and when all other fixtures are turned off, these lights can be illuminated at night for a beautiful, soft glow.

Display lighting: Puck lights are an ideal and efficient solution for lighting up glass-front cabinets for displays.

IMPORTANT: Don’t forget switches!
Place light switches in convenient and accessible locations. Consider installing one at each room entrance, near table nooks, under cabinets and next to the sink.

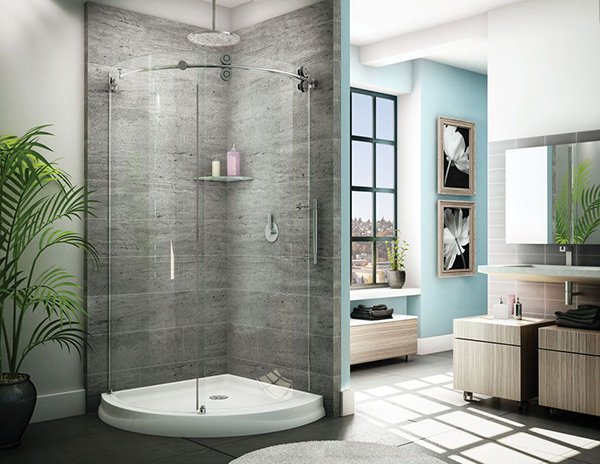
Best Home Lighting Ideas for Bathrooms

Vanity lighting: Depending on the layout and size of the vanity, the lighting specifications could include one large light fixture over the mirror, or single fixtures over multiple mirrors; and/or wall sconces on either side of the vanity.

Shower lighting: Most often, the shower/fan combination is used to illuminate the shower space and provide an exhaust for moisture. Of course, these are waterproof fixtures and switches should be installed just outside the shower entrance.

Focal point lighting: We’re seeing a lot of free-standing tubs incorporated in bathrooms designs these days. It’s important to note that while the idea of a beautiful chandelier suspended over the tub sounds fabulous — it’s a hazard and NOT part of these best home lighting ideas. It’s also a building code violation. To avoid this possible hazard, it’s best to install an additional can light, or illuminate your bathroom with track lighting that can be adjusted to highlight the tub.

Best Home Lighting Ideas for the Living Room

Ambient lighting: This serves as the general light source for your living room. For extra comfort, you may opt for a ceiling fan fixture that includes lights, which is easy to customize or change out with available light kits.

Flush or semi-flush mount fixtures and chandeliers can also be used as the primary light source but be sure to follow the layering rule when implementing this best home lighting ideas.

Task lighting: Table and floor lamps are the ideal way to add task-specific lighting for reading, games, etc. As you plan your space, be sure to factor in outlets in the wall and/or ceiling to give you the options you need for easy access.

Display lighting: Track lighting is ideal for showcasing artwork on the wall or in other display areas.

In addition to layering your lighting, keep scale and size in mind as you select fixtures. Installing a light fixture that is too large can drown out your space, and undersized lighting can throw off the room’s proportions.

Again, don’t be afraid to mix it up. When you achieve the ideal balance with your lighting, the finished effect will feel right at home while providing style and good taste.

Cad Pro’s custom home design software is an affordable and easy alternative to other home design and remodeling software programs. Cad Pro is great for creating custom remodeling home plans, floor planshouse plans, outdoor kitchen plans, deck plans and patio designs, and much more.

Click Here to Get Started

Continue Reading →

Top-Rated Flooring Design Ideas

Become an educated buyer when shopping for flooring with these top-rated flooring design ideas. Don’t rely on big box stores and their associates to provide you with all the information you need. Many times, the products they sell are of lesser quality.

To become educated on quality flooring, it’s recommended you go to a reputable flooring showroom where all types (with many price points) are displayed. Associates at a “flooring only” store will be able to share their knowledge and help you choose the product that will suit your family, home, decor and lifestyle.

When choosing flooring, it’s imperative to think about several things: the room the flooring is going in, the type of foot traffic, wear and tear it will receive, the décor of the room and your budget. With so many things to factor in, it’s nice to know the pros and cons of each type of flooring and these top-rated flooring design ideas.

Top-Rated Flooring Design Ideas

Wood Look Tile is One of The Top-Rated Flooring Design Ideas

Share Your Top-Rated Flooring Design Ideas

Share your flooring design ideas with clients, contractors or team members using Dropbox®, Google Drive™, OneDrive®, and SharePoint®. Export files to Microsoft Word®, Excel®, and PowerPoint® with a single click. CAD Pro is used by homeowners, contractors and designers for all types of remodeling design ideas.

Carpet #1 Top-Rated Flooring Design Ideas

Pros

  • Energy saver: Carpet can act like another layer of insulation and help keep cold or warm drafts from seeping through the floor.
  • Feels great: It goes without saying that carpet is always going to be the softest of any type of flooring.
  • Sound: Carpet helps to reduce sound and noises from one floor to the next.
  • Durability: Manufacturers have advanced the wear, tear and durability of carpet for it to last longer with proper care and makes it one the most cost effective top-rated flooring design ideas.

Cons

  • Maintenance: Regular vacuuming is needed (every one to two days for high traffic areas) frequently. Spills need to be removed immediately to prevent staining and liquid to seep deep into fibers to cause mold and mildew. Carpets also need regular professional carpet cleaning to remove ground in dirt and grime.

Hardwood #2 Top-Rated Flooring Design Ideas

Pros

  • Value: An upgrade to hardwood floors will add a lot of value to your home.
  • Durability: When hardwood floors are properly cared for, they will last a very long time. When the floors are worn down some, a little TLC can bring them back to their natural glory.
  • Maintenance: Hardwood floors are easy to care for by sweeping or vacuuming them daily and wiping them with an approved wood cleaner.
  • Variety: There are many different types of woods, stains and plank sizes.

Cons

  • Cost: Hardwood floors can be a substantial expense to have installed.
  • Cold: They can be colder to the touch compared to other flooring options.
  • Noise and not so pet-friendly: Every step that is taken on wood floors can be heard. Not to mention, furry friends can slip and slide because their padded feet can’t grip the shiny, smooth surface.
Laminate #3 Top-Rated Flooring Design Ideas

Pros

  • Installation: Many manufacturers make a “Click-Lock” design that makes it extremely easy to install. With laminate flooring, you should be able to use all the pieces in a box, unlike hardwood flooring products.
  • Cleanup: The protective layer on laminate helps protect it from something that would normally stain easily.
  • Maintenance: Vacuum away loose dirt and debris and mop with a damp mop.

Cons

  • Value: Laminate may look like hardwood but doesn’t have the same value.
  • Feel: There are many negative ways people describe laminate flooring, “Loud, slippery, hard, etc.” Some laminate flooring can be very slippery, too.
  • Maintenance: Laminate flooring is easily dented. Laminate flooring cannot be sanded or refinished. Areas with large scratches or gouges need to be replaced with new laminate flooring.
Luxury Vinyl Tile #4 Top-Rated Flooring Design Ideas

Pros

  • Design choices: There are many unique variety of colors and designs, inspired by the colors and patterns found in nature. Tiles can be grouted to make it look more like ceramic or stone.
  • Quick installation: A typical installation can be completed in half the time it takes to complete a comparable ceramic tile installation.
  • Durability: Luxury vinyl tile is highly durable and scratch-resistant, making it an excellent choice for heavy foot traffic areas and one of the more popular top-rated flooring design ideas.
  • Feel: LVT is comparatively warmer to the touch than ceramic and other natural stones. It also absorbs sound and creates a more peaceful atmosphere.
  • Maintenance: Regular sweeping, vacuuming and mopping can maintain this flooring for many years.

Cons

  • Cost: Don’t think inexpensive vinyl flooring or “peel and stick” tiles. Luxury vinyl tile can cost as much as some standard hardwood or ceramic tile.
  • Transitions: Manufacturers need to address transitions, as the only option right now is staining unfinished wood pieces to match.

Cad Pro’s custom home remodeling projects and design software are affordable and easy alternatives to other home design and remodeling software programs. Cad Pro is great for creating custom remodeling home plans, floor planshouse plans, outdoor kitchen plans, deck plans and patio designs, and much more.

Click Here to Get Started

Continue Reading →

How to Create Effective Emergency Evacuation Diagrams

CAD Pro has put together these helpful tips for how to create effective emergency evacuation diagrams.

An effective emergency evacuation diagram will ensure facility occupants can quickly and easily get the information they need to evacuate the facility, if required, in the event of an emergency. As an integral part of a property’s Emergency Management Plan, evacuation diagrams are designed to inform occupants of the emergency evacuation procedures, locations and directions of the nearest emergency exits, fire equipment, the assembly areas and who to call in the event of an emergency.

CAD Pro’s evacuation design software provides the necessary design tools and features that anyone can use when creating an effective emergency evacuation diagram. There are no limits to the variety of evacuation diagrams or plans you can create with CAD Pro.

Share your emergency evacuation diagrams and plans with clients, colleagues, contractors or friends and family using Dropbox®, Google Drive™, OneDrive®, and SharePoint®. Export files to Microsoft Word®, Excel®, and PowerPoint®.

How to Create Effective Emergency Evacuation Diagrams

How to Create Effective Emergency Evacuation Diagrams for a School

What is an Effective Emergency Evacuation Diagram

An evacuation plan lays out how to exit a building safely during an emergency. … In case of a fire, carbon monoxide leak, earthquake or other emergency, everyone in your facility should be familiar with your evacuation plan.

Information for how to create effective emergency evacuation diagrams is intended to provide emergency and evacuation information for occupants and visitors. They should contain concise, clear and appropriate details to inform occupants and visitors in an emergency.

When there’s a high level of smoke or carbon monoxide in your facility, you need to exit as quickly as possible. According to the National Fire Protection Association (NFPA), your ability to exit your facility in the event of an emergency depends on advance warning as well as advance planning.

In case of a fire, carbon monoxide leak, earthquake or other emergency, everyone in your facility should be familiar with your emergency evacuation diagram and procedures.

How to Create Effective Emergency Evacuation Diagrams with Wardens

Generally, one warden for every 20 employees should be adequate, and the appropriate number of wardens should be available at all times during working hours. Employees designated to assist in emergency evacuation procedures should be trained in the complete workplace layout and various alternative escape routes.

5 Tips for How to Create Effective Emergency Evacuation Diagrams

  1. Identify where you can go in the event of an evacuation. Try to have more than one option: the home of a friend or family member in another town, a hotel, local fire department or a shelter. Keep the phone numbers and addresses of these locations handy.
  2. Map out your primary routes and backup routes to your evacuation destinations in case roads are blocked or impassable. Try to have a physical map of the area available in case GPS satellite transmissions are down or your devices run out of power.
  3. Pre-arrange a designated place to meet in case your colleagues or family members are separated before or during the evacuation. Make the location specific, for example, “meet at the big clock in the middle of town square” not “meet at the town square”. Ask an out-of-town friend or family member to act as a contact person for your evacuation.
  4. Put all evacuation plans in writing along with pertinent addresses and phone numbers and give them to each co-worker or member of the family. Note that most printer inks are NOT waterproof, so take appropriate precautions to ensure legibility.
  5. Listen to the National Oceanic and Atmospheric Administration (NOAA) Weather Radio or local radio or TV stations for evacuation instructions. If advised to evacuate, do so immediately.

Cad Pro’s popular design software is an affordable and easy alternative to other more expensive software programs. Cad Pro is great for showing how to create effective emergency evacuation diagrams, custom home plansbuilding plansoffice plansconstruction details, and much more.

Click Here to Get Started

Continue Reading →

Crime Scene Response Guidelines

The purpose of any crime scene investigation is to help establish what happened (crime scene reconstruction) and to identify the suspect(s) and here are some very effective crime scene response guidelines that will assist any investigator in a successful crime scene investigation. This is done by carefully documenting the conditions at a crime scene and recognizing all relevant physical and DNA evidence. The ability to recognize and properly collect physical evidence is oftentimes critical to both solving and prosecuting violent crimes. It is no exaggeration to say that in most cases, the law enforcement officer who protects and searches a crime scene plays a critical role in determining whether physical evidence will be used in solving or prosecuting violent crimes.

Effective Crime Scene Response Guidelines and Diagrams

Creating accurate and effective crime scene investigation diagrams will help investigators recall details of the crime scene when preparing for the courts or case you may be working on.

CAD Pro’s drafting and design software provides the necessary design tools and features that anyone can use for accurate and effective crime scene response guidelines and diagrams. Accurately portray the physical facts, relate the sequence of events, establish precise location and relationship of objects and evidence while creating a permanent record of the crime scene.

Share your crime scene diagrams with investigators, legal aids, colleagues and clients using Dropbox®, Google Drive™, OneDrive®, and SharePoint®. Export files to Microsoft Word®, Excel®, and PowerPoint®.

Crime Scene Response Guidelines

Crime Scene Response Guidelines and Diagrams

When creating your crime scene response guidelines, CAD Pro can assist you in all aspects of your crime scene investigation guidelines and diagrams.

Despite what TV and movies portray, crime scene investigation is a difficult and time-consuming job. There is no substitute for a careful and thoughtful approach and following these effective crime scene response guidelines.

An investigator must not leap to an immediate conclusion as to what happened based upon limited information but must generate several different theories of the crime, keeping the ones that are not eliminated by incoming information at the scene. Reasonable inferences about what happened are produced from the scene appearance and information from witnesses. These theories will help guide the investigator to document specific conditions and recognize valuable evidence.

Documenting Crime Scene Response Guidelines

Documenting crime scene conditions can include immediately recording transient details such as lighting (on/off), drapes (open/closed), weather, or furniture moved by medical teams. Certain evidence such as shoe prints or gunshot residue is fragile and if not collected immediately can easily be destroyed or lost. The scope of the investigation also extends to considerations of arguments which might be generated in this case (suicide/self-defense) and documenting conditions which would support or refute these arguments. These are important conditions when setting any type of crime scene response guidelines.

In addition to these crime scene response guidelines, it is important to be able to recognize what should be present at a scene but is not (victim’s vehicle/wallet/keys) and objects which appear to be out of place (ski mask) and might have been left by the assailant. It is also important to determine the full extent of a crime scene. A crime scene is not merely the immediate area where a body is located or where an assailant concentrated his activities but can also encompass a vehicle and access/escape routes.

Evidence for Crime Scene Response Guidelines

Although there are common items which are frequently collected as evidence (fingerprints, DNA samples, shoe prints, or bloodstains), literally any object or sample can be physical evidence. Anything which can be used to connect a victim to a suspect or a suspect to a victim or crime scene is relevant physical evidence. Using these crime scene response guidelines “shopping list” approach (collecting all bloodstains, hairs, or shoe prints) will probably not result in recognizing the best evidence. For example, collecting bloodstains under a victim’s body or shoe prints from emergency personnel will rarely answer important questions. Conversely, a single matchstick (not usually mentioned as physical evidence) recovered on the floor near a victim’s body can be excellent physical evidence since it can be directly tied to a matchbook found in a suspect’s pocket.

Since a weapon or burglar tool is easily recognized as significant physical evidence, it is frequently destroyed by the perpetrator. Sometimes the only remaining evidence is microscopic evidence consisting of hairs, fibers, or other small traces the assailant unknowingly leaves behind or takes with him. Although this evidence is effectively collected when the clothing of the victim or suspect is taken, protocols (involving tape lifts) should be in place to process nude bodies so as not to lose this fragile evidence.

Overview of Crime Scene Response Guidelines

Personnel Duties and Responsibilities

  • Team Leader
  • Photographer and Photographic Log Recorder
  • Sketch Designer
  • Evidence Recorder/Evidence Recovery Personnel
  • Specialists

Organization and Procedures for Search Operations

  • Preparation
  • Basic Stages in a Search
  • Approach Scene
  • Secure and Protect Scene
  • Initiate Preliminary Survey
  • Evaluate Physical Evidence Possibilities
  • Prepare Narrative Description
  • Photograph Scene
  • Prepare Diagram/Sketch of Scene
  • Conduct Detailed Search/Record and Collect Physical Evidence
  • Conduct Final Survey
  • Release Crime Scene

Documentation Procedures

  • Administrative Worksheet
  • Narrative Description
  • Photographic Log
  • Diagram/Sketch
  • Evidence Recovery Log
  • Latent Print Lift Log
Creating Crime Scene Response Guidelines

CAD Pro has helped thousands of investigators, attorneys, and clients streamline the process of producing effective crime scene response guidelines and diagrams for clients and colleagues. Cad Pro is an affordable and easy alternative to other more expensive CAD (computer-aided design) software programs. Cad Pro is great for creating custom home plansbuilding plansoffice plansconstruction details, and much more.

Click Here to Get Started

Continue Reading →

How to Create Effective Crime Scene Diagrams

Here are some very helpful tips for how to create effective crime scene diagrams. Properly prepared crime scene layout diagrams are very useful for investigators, attorneys and the courts. An accurate crime scene drawing will help investigators recall details of the crime scene for any court case.

CAD Pro’s drafting and design software provides the necessary design tools and features that anyone can use for accurate crime scene layout drawings. Accurately portray the physical facts, relate the sequence of events, establish precise location and relationship of objects and evidence while creating a permanent record of the crime scene.

Share your crime scene layout drawings with investigators, legal aids, colleagues and clients using Dropbox®, Google Drive™, OneDrive®, and SharePoint®. Export files to Microsoft Word®, Excel®, and PowerPoint®.

There are no limits to the variety of crime scene diagrams you can create with CAD Pro.

How to Create Effective Crime Scene Diagrams

CAD Pro Tips for How to Create Effective Crime Scene Diagrams

What is a Crime Scene Diagram?

A crime scene diagram visually documents the setting of a crime as it appeared when it was discovered. It typically includes a layout of the environment, location of the victim(s), blood splatter, possible items of interest like weapons, footprints, dirt, clothes along with written details and pictorial evidence. A properly prepared crime scene diagram is very useful for investigative and forensic work in the criminal justice system. A supplemental vehicle diagram may be used in the event the crime took place in or involved a car, truck, van, or other type of vehicle.

Guidelines for How to Create Effective Crime Scene Diagrams

  • Observe and plan
  • Measure distances
  • Outline the area
  • Locate objects and evidence within the outline
  • Record details
  • Make notes
  • Identify the sketch with a legend and a scale

How to Create Effective Crime Scene Diagrams with Interactive Features

CAD Pro is the first drawing/design software application that lets users insert pop-up images or photos, pop-up text notes and precise verbal comments or audio sound files. When incorporating these features in your crime scene layout drawings, it eliminates any discrepancy’s that may arise when presenting your crime scene evidence.

Outline for How to Create Effective Crime Scene Diagrams

Any crime scene diagram starts with a floor plan of where the crime was committed: a home, office, street, or business.

Easily edit the scene using CAD Pro’s powerful floor plan features. Add walls, windows, and doors more with just a few clicks. Resizing and editing walls is just as easy. And everything is exactly to scale, complete with industry standard dimensions.

Seven Tips for How to Create Effective Crime Scene Diagrams

Follow these best practice tips to create effective crime scene diagrams that convey information quickly and accurately.

Set the scope of your diagram. Before beginning, determine how much of the area to illustrate: one room, multiple rooms, or the entire house. You should only illustrate relevant rooms and areas.

Gather crime scene information. Crime scene diagrams must be as accurate as possible to be a useful resource when looking back on details of a crime long after the area has been cleaned up. If you were not there yourself, speak with anyone who either has first-hand knowledge or investigated the scene. Good sources would be the police, detectives, and any witnesses involved with the case, either directly or indirectly. If possible, visit the scene yourself to gather the most accurate information. Take accurate measurements between objects in the scene and their relative position to furniture or other landmarks.

Create the background floor plan or landscape. Recreate the parts of the scene as they would appear on a normal day. For a crime that occurred inside, this includes adding the walls within which the crime occurred, as well as furniture, doors, windows, closets, appliances, etc. For an outside scene, begin with streets, sidewalks, and buildings, before adding plants, benches, lights, cars, signs, and so on.

Add crime scene details. Now add objects that were specific to the crime scene. If there was a victim, or anyone present, they should be added into the drawing as they were found directly after or during the crime. Also add anything the perpetrator may have left behind, used, or disrupted while in the area.

Label Evidence. Label each potential piece of evidence with a number or symbol. Then use arrows and text to show additional details or give information about that item. Also, give measurements for enough of the area that an observer could easily deduce the dimensions of anything on the diagram.

Verify accuracy. Consult with witnesses and authorities who are knowledgeable about the crime to confirm that the information depicted in the diagram coincides with theirs. This is one of the most important tips for how to create effective crime scene diagrams.

CAD Pro has helped thousands of investigators, attorneys, and clients streamline the process of how to create effective crime scene diagrams for clients and colleagues. Cad Pro is an affordable and easy alternative to other more expensive CAD software programs. Cad Pro is great for creating custom home plansbuilding plansoffice plansconstruction details, and much more.

Click Here to Get Started

Continue Reading →

Guidelines for Building Evacuation Diagrams

This article provides guidelines for building evacuation diagrams and the process of creating a simple building evacuation diagram.

In addition to exit signs that guide people to safety, some buildings — like hotels, hospitals, nursing homes and high-rise buildings — are required to post an evacuation diagram. These diagrams are critical to the safe evacuation of people during an emergency.

However, there is no fire or building code standard for building evacuation diagrams: what they must contain, where they are located, what language(s) they must use, or any other item that may go on a diagram.

That’s why it’s important for codes officials to create their own policies for diagrams that help building managers evacuate people.

CAD Pro’s drafting and design software provides the necessary design tools and features that anyone can use when creating the guidelines for building evacuation diagrams. There are no limits to the variety of building evacuation diagrams you can create with CAD Pro.

Share your building evacuation diagrams with clients, contractors or friends and family using Dropbox®, Google Drive™, OneDrive®, and SharePoint®. Export files to Microsoft Word®, Excel®, and PowerPoint®.

Guidelines for Building Evacuation Diagrams

Plans and Guidelines for Building Evacuation Diagrams

General guidelines for building evacuation diagrams

  • Keep it simple. Show the basic layout of the building (by floor level), including walls and doors.
  • Make the sign large enough so that it is clearly seen.
  • Color-code items on the sign to make them easier to understand.
  • Post signs at or near means of egress, entrances to stairs, in elevator lobbies, and in any area where there are a lot of people.

What to include in Guidelines for Building Evacuation Diagrams

  • Identify the starting point with the words “You are here.” This will vary according to where the sign is posted.
  • Provide a simple compass in one corner of the plan, showing north with the letter “N.”
  • Mark the egress paths that are available from the starting point. Highlight exterior or stair enclosure doors with the word “Exit.”
  • Show the location of fire extinguishers and manual fire alarm pull stations.
  • Identify any outdoor gathering areas.

Other items to consider in Guidelines for Building Evacuation Diagrams

  • Mark accessible exits, first-aid kits, automated external defibrillators (AEDs), eyewash stations, Material Safety Data Sheet locations, the telephone switchboard, or any other item that is significant to the building.
  • Include Braille code for any wording.
  • Use other languages that are appropriate for your community.
Action steps for Guidelines for Building Evacuation Diagrams
  • Create or review policies that address and standardize building evacuation diagrams.
  • Gather examples of best practices for diagrams that you can share with building managers.
  • Review building evacuation diagrams when you conduct codes inspections.

Cad Pro’s popular design software is an affordable and easy alternative to other more expensive CAD software programs. Cad Pro is great for creating custom home plansbuilding plansoffice plansconstruction details, and much more.

Click Here to Get Started

Continue Reading →

Best Mini Storage Building Design Tips

We have put together the best mini storage building design tips when choosing and designing your mini storage buildings, there are several standard / common layouts, however, you can customize them to fit your needs. Working with a mini storage building design software such as CAD Pro will save time and money.

CAD Pro’s drafting and design software provides the design tools and features that anyone can use for popular mini storage designs and blueprints. There is no limit to the variety of styles and sizes of mini storage floor plans you can design with CAD Pro.

Share your mini storage plans with clients, contractors or friends and family using Dropbox®, Google Drive™, OneDrive®, and SharePoint®. Export files to Microsoft Word®, Excel®, and PowerPoint®.

Best Mini Storage Building Design Tips

Best Mini Storage Building Design Tips & Floor Plans

Best Mini Storage Building Design Tips and Descriptions

Below are descriptions of popular mini storage building floor plans, however, you can customize your floor plans to any unit mix desired. One of the best mini storage building design tips is to maintain 5′ spacing to maintain cost effective pricing and functionality.

Tip #1 – Single Slope Floor Plans
Standard single slope buildings with doors along one side are common. One the most popular and best mini storage building design tips for a single slope floor plan is along a street side of site. Single slope buildings are also common for RV storage buildings. The mini storage building floor plans you create should have end units on one end wall or on both end walls. The length and width of your buildings are determined by your lot size and configuration.

Tip #2 – Gable Roof with Equal Units Set Back to Back
Equal units are standard in gable buildings with doors along both sides. When utilizing mini storage building design software, the floor plans can be customizable to have end units on one end wall or on both end walls. You can also customize the length and width of your building based on your lot size and configuration.

Tip #3 – Gable Roof with Non-Equal Units Set Back to Back
Best mini storage building design tips for Non-Equal units is a common gable building with doors along both sides. This is common when there are two different unit depths desired in the same building. You can customize your floor plans, so they have end units on one end wall or on both end walls. You can also customize the length and width of your building based on your lot size and configuration.

Best Mini Storage Building Design Tips for Customizing

Tip #4 – Custom Mini Storage Building Floor Plans
Custom mini storage building floor plans are common when there are unique unit size requests that need to be met. You will need to customize the length and width of your building based on your lot size and configuration. CAD Pro drafting software provides the features for creating these custom mini storage building plans.

Tip #5 – Climate Controlled Mini Storage Floor Plans
Climate controlled building floor plans are completely customizable. It is common to have 5′ hallways with doors on either side. Climate controlled buildings can have all units indoors, or a combination of indoor and outdoor units. The length and width of your building will be customized based on your lot size and configuration.

Click Here to Get Started

Continue Reading →

10 Best Backyard Landscape Ideas

No matter how you utilize your backyard space, a little time outdoors will do you good. Try these 10 best backyard landscape ideas and improvements to turn your backyard into your own personal oasis. Your backyard can serve many purposes such as a gardening hub, a space for entertaining family and friends, or even just the perfect place to relax on a beautiful day.

Cad Pro’s custom home remodeling projects and design software are affordable and easy alternatives to other home design and remodeling software programs. Cad Pro is great for creating remodeling plans, floor planslandscape drawings, outdoor kitchen plans, deck plans and patio designs, and much more.

10 Best Backyard Landscape Ideas

Affordable 10 Best Backyard Landscape Ideas

A List of the 10 Best Backyard Landscape Ideas

#1 – Potted Plants
While all backyards need shrubs and trees, consider adding potted plants to your backyard designs for more dimension in your garden. Container favorites include begonias, asters and azaleas. Fill containers with an organic potting mix, to ensure proper drainage and best results. Potted plants are one of the most economical 10 best backyard landscape ideas.

#2 – Kids Corner/Playgrounds
Get kids outside by making the backyard fun for them, too. Add an outdoor DIY chalkboard where kids can express their creativity. Games and toys like hopscotch or jump rope are perfect for warm nights outside. You can even encourage them to eat healthy by growing a vegetable and fruit garden.

Gardens Highlight the 10 Best Backyard Landscape Ideas

#3 – Edible Gardens
Yards can be purposeful, too. Growing your own fruits and veggies ensures the best quality, convenience and taste. Grow plants in raised bed gardens or containers, if you’re short on space. Some plants offer year-round foliage, tasty fruit and space saving, and some plants are good for your garden. Choose dwarf varieties such as those from Bushel & Berry for growing in containers.

#4 – Refurbished Household Items
Instead of throwing away old household items, give them new life in the garden. Almost anything can be turned into a container garden, from toolboxes to wheelbarrows. Fill empty wine or beer bottles with LED lights for unique lanterns. Refurbished items are a definite money saver for the 10 best backyard landscape ideas.

#5 – DIY Lanterns & LED Lights
DIY lanterns make for a great crafting project and add a unique touch of light to your backyard. Add candles or LED lights to mason jars or painted tin cans.

Outdoor Fires in the 10 Best Backyard Landscape Ideas

#6 – Fire Pits
Nothing says summer like a backyard bonfire. Purchase a fire pit at your local garden center or create your own fire pit using stone or brick surrounded with gravel or small stones. Grab some comfy furniture, family and friends and get ready for s’more season. This idea really warms up the 10 best backyard landscape ideas.

#7 – String lights
Enchanting string lights turn your backyard into an outdoor oasis. Hang them between posts, dangle from walls or ceilings or even wrap them around planters or trees.

#8 – Outdoor Furniture
Durable yet comfy outdoor couches and chairs make your backyard the perfect space for entertaining. Hang a hammock between two shady spots for a place to catch up on some reading.

#9 – Walkways and Paths
Use gravel, stepping stones, or wooden pallets to create a walkway through your garden. Line the path with low-growing shrubs or groundcovers like verbena, hostas or sedges.

#10 – Add a Water Feature
Adding some type of water features is a favorite of the 10 best backyard landscape ideas. Adding water fountains to your backyard will create a Zen garden effect. Tiered fountains look great in any backyard and add the soothing sound of running water. Create a small pond to create visual contrast with your plants. Birdbaths can also serve as a focal point and provide shelter for our friends in the sky.

Any of these 10 best backyard landscape ideas will be sure to turn your outdoor space into a fun, relaxing and beautiful space.

Click Here to Get Started

CAD Pro has helped thousands of homeowners, professional designers, builders, and contractors plan and design all types of outdoor plans. CAD Pro is used by NARI professional remodelers and contractors and the NRCA roofing contractors. CAD Pro is also used by NHBA home builders and contractors, the National Kitchen & Bath Association (NKBA). as well as the (NALP) National Association of Landscape Professionals.

Continue Reading →

Top 5 Bathroom Design Ideas

CAD Pro has put together these top 5 bathroom design ideas for anyone who may be buying, selling or remodeling a home. The choice may depend on whether you’re thinking about selling your house in the short term or you plan to stay put or you may want to remodel your bathroom to reflect your personality and tastes.

The good news is that several popular bathroom design trends today also have potential staying power while increasing home value. Cad Pro’s custom home remodeling projects and design software are affordable and easy alternatives to other home design and remodeling software programs. Cad Pro is great for creating custom remodeling home plans, floor planshouse plans, outdoor kitchen plans, deck plans and patio designs, and much more.

Top 5 Bathroom Design Ideas

Curved Shower Doors – Top 5 Bathroom Design Ideas

Here are the Top 5 Bathroom Design Ideas

#1 – Transitional Style Bathroom Design

If you’re remodeling your bathroom with the aim of selling your house, then a transitional style which is a combination of traditional and contemporary design elements. This being the first of the top 5 bathroom design ideas is ideal because it appeals to a wide range of potential homebuyers.

Bathroom trends are shifting from traditional style to transitional and into contemporary, according to the National Kitchen & Bath Association (NKBA) trend survey. This style lets you take various traditional and contemporary elements you like and blend them together. Transitional style can be a great compromise for people who like different styles.

For example, a curved dark wood bathroom vanity would be considered classic. Pairing it with a shower with a curved door, considered contemporary, works well because curves are the common denominator. A vanity that is clean and sleek but also very functional, with plenty of storage, would fall into the transitional category.

When it comes to showers, many homeowners prefer to eliminate the bathtub altogether in the master bathroom and focus on the shower, the National Association of Home Builders revealed in its 2013 report, “What Home Buyers Really Want.” Elaborate showers with glass, curved doors, multiple shower heads and tiled walls are in demand.

The Color Gray Makes the List of Top 5 Bathroom Design Ideas

#2 – Gray Walls

Another trend in bathrooms, as well as in kitchens, is the rising popularity of the color grey. The color grey offers a feeling of elegance and sophistication, gray also conveys simplicity.

Regardless of what paint color you choose, a fresh coat of paint in the bathroom is one of the most dramatic and popular changes you can make. Putting on a new coat of paint makes a bathroom look clean and bright.

If you’re planning to sell your home, gray walls are a safe choice because the color is fairly neutral and will appeal to a variety of buyers.

Material for the Top 5 Bathroom Design Ideas

#3 – Quartz Countertops

While granite has been a traditional favorite for bathroom counters, quartz is a close second. Quartz offers many benefits:

  • It’s non-porous, which makes cleanup a breeze.
  • Quartz countertops are scratch-resistant and come in a broad range of colors and textures.
  • You won’t need sealers or special cleaners.
  • The varied hues of quartz complement a range of bathroom color choices.

#4 – Undermount Sink

The undermount sink continues to be a constant favorite because of its sleek, streamlined design. With no rim around the sink to sit above the countertop, undermount sinks are well-suited to small bathrooms and can alter the look of the space.

Undermount sinks are available in a variety of shapes — rectangular, square, oval, and circle. They also come in a range of colors and materials.

Tile is the Leader of the Top 5 Bathroom Design Ideas

#5 – Tile Backsplash

Tile backsplashes is the best design option of the top 5 bathroom design ideas while bringing depth and texture to any bathroom, with glass an increasingly popular option. Tiling above the sink or in the bathtub or shower can add a beautiful pop of color.

Blocks of mosaic tile and glass are popular and offer rich color and texture for the bathroom. Wood grain tiles are an excellent choice for the bathroom floors.

Click Here to Get Started

Continue Reading →

Common Remodeling Countertop Installation Mistakes

Installing new countertops is a great way to update your kitchen and increase the value of your home. But this project isn’t without its risks. Experts say some common remodeling countertop installation mistakes stand to tank your investment and cost you thousands of dollars to repair.

Cad Pro’s custom home remodeling projects and design software are affordable and easy alternatives to other home design software and remodeling software. Cad Pro is great for creating custom remodeling home plans, floor planshouse plans, outdoor kitchen plans, deck plans and patio designs, and much more.

Share your remodeling plans and designs with clients or team members using Dropbox®, Google Drive™, OneDrive®, and SharePoint®. Export files to Microsoft Word®, Excel®, and PowerPoint® with a single click.

Common Remodeling Countertop Installation Mistakes

Avoid Common Remodeling Countertop Installation Mistakes

8 Common Remodeling Countertop Installation Mistakes

  1. # 1 – Saving your old backsplash

Saving your old backsplash is one of the most common remodeling countertop installation mistakes. When saving your old backsplash this forces your pros to work around old tile, which can cause problems with measurements and fit and usually causes serious cosmetic issues.

Number one, leaving your old backsplash compromises the ability to create a proper template, and that results in a poorly fitting countertop altogether. Number two, many times the cabinets aren’t level, so the installer must shim the countertop up to the highest point. That means your new countertops won’t fit under the old backsplash, leaving an uneven line along the back.

  1. # 2 – Using the wrong seam epoxy

Not all seam epoxies are the same which leads to one of the common remodeling countertop installation mistakes. In fact, using the wrong kind of epoxy can make your countertop seams obvious and ugly.

Using clear or not color-matched epoxy will call attention to your seams. A good contractor will use a space-age, computer-matched epoxy that works within different color ranges. These epoxies are pre-matched to your countertops which leads to no guesswork.

  1. # 3 – Choosing the wrong countertop material

Home repair and maintenance shows are fun to watch, but it’s important to do your own research when it comes to pricing.

Many homeowners are mislead by TV shows that promote misleading cost estimates. One example is a customer thought that a $5,500 job would cost only $2,200 and was basing this estimate on prices they had seen on a TV remodeling show therefore creating a common remodeling countertop installation mistakes. Always talk to a professional to get a real idea of what your job is going to cost.

Material Is One of The Common Remodeling Countertop Installation Mistakes

  1. # 4 – Choosing the wrong material

Each countertop material has unique requirements when it comes to long-term care. It’s crucial to know the type of maintenance your countertops will need to retain their beauty and luster over time and to choose a material that realistically suits budget, tastes and lifestyle.

If you install granite, you will want to use a cutting board when prepping food. You will also want to clean the surface with soap and water, and do not use any kind of acidic cleaner, because acid will eat up the finish and cause a dull finish.

  1. # 5 – Not hiring a professional plumber

There’s a good chance your countertop installation will involve plumbing work. While your countertop installer may be able to tackle minor plumbing tasks, it’s best to hire a licensed professional. It’s important to always have a licensed master plumber working on any type of remodeling projects that requires any plumbing to be moved or replaced, this will save you money in the long run.

  1. # 6 – Adding to much weight to a raised bar or island

Many homeowners also include new countertop material on the raised portion of their bar or kitchen island, which can cause major structural problems if not properly supported.

There’s normally a three-quarter-inch piece of plywood that is attached to most bar tops. If you’re taking off laminate and installing a heavy stone like granite or quartz, you will be adding an extra 300 or 400 pounds to that three-quarter-inch support. If someone sits or jumps on it, it could all come down and possibly cause injury to someone. So here is a suggestion to avoid these common remodeling countertop installation mistakes; cut off the raised bar and open-up your counter space. It’s stronger and safer while adding a feeling of a larger space.

Not Leveling Is A Common Remodeling Countertop Installation Mistakes

  1. # 7 – Not leveling countertops

Making sure your countertops are flat against your cabinets is a critical part of a quality install and is very important for the overall cosmetic appearance.

Always make sure your countertops are level with the highest point of your cabinets. Failing to do this puts your counters — especially natural stone like granite — under a ton of pressure. This can cause the entire slab to break and crack resulting in additional cost.

  1. # 8 – Installing an unsupported

Countertop materials may be strong, but they’re also very heavy. Never allow your material, especially natural stone, to hang out too far without the proper support.

There should never be more than 10 inches of unsupported countertop overhang, especially with granite or other stone materials. Overhangs on islands or peninsulas are common places where this happens. If you’re planning on having a longer overhang, support it with a piece of flat steel that goes under the countertop.

Click Here to Get Started

Continue Reading →